How to Install Electric Fence Gate Handle ?
- Jun 02, 2023
- | 36
Electric fences are an effective means of containing animals and protecting your property. However, accessing the fenced area can be challenging without a gate handle. An electric fence gate handle serves as a safe and insulated grip to open and close the gate without compromising the electrification of the fence.
By following the installation process outlined below, you can have a functional electric fence gate handle in no time.
Understanding the Electric Fence Gate Handle
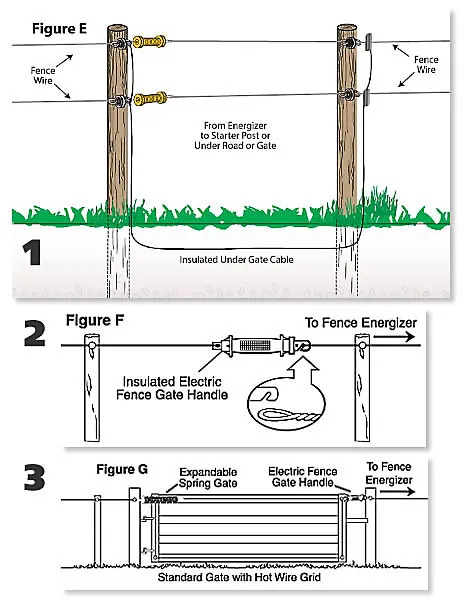
An electric fence gate handle is a specially designed component that allows you to open and close the gate without coming into direct contact with the electrically charged fence wires. It consists of a handle grip, a gate attachment point, and an insulated connector that ensures electricity flows through the fence wire but doesn't reach the person operating the gate.
Tools and Materials Required
Before you begin the installation process, gather the following tools and materials:
- Electric fence gate handle
- Gate attachment bracket
- Insulated connector
- Wire cutters
- Screwdriver
- Measuring tape
- Electric fence wire
- Galvanized fence staples
- Grounding rod (if necessary)
- Grounding wire (if necessary)
Ensure that you have all the necessary tools and materials readily available to complete the installation smoothly.
Step-by-Step Installation Guide
Follow these steps to install an electric fence gate handle:
Preparing the Gate
Before installing the gate handle, ensure that your gate is properly aligned and securely mounted. Inspect the gate hinges and latch to ensure they are in good working condition. Make any necessary repairs or adjustments before proceeding.
Mounting the Electric Fence Gate Handle
Measure and mark the desired height for the gate handle on the gatepost. Typically, the handle should be placed at a convenient height for easy access. Use a screwdriver or drill to attach the gate attachment bracket securely to the gatepost at the marked height.
Connecting the Electric Fence Wire
Cut a piece of electric fence wire long enough to reach from the gate attachment bracket to the fence wire. Strip a small portion of insulation from the ends of the wire. Connect one end to the gate attachment bracket using the provided insulated connector, ensuring a secure and tight connection. Attach the other end of the wire to the electric fence wire using galvanized fence staples.
Testing the Electric Fence Gate Handle
Once the gate handle and wire connections are secure, it's crucial to test the functionality of the gate handle. Ensure the electric fence is energized, and then attempt to open and close the gate using the gate handle. Verify that the gate handle provides a safe and insulated grip and that the electric fence wire remains properly charged.
Safety Precautions
When working with electric fences, safety should always be a priority. Follow these safety precautions during the installation process:
- Ensure the electric fence is turned off or disconnected before starting the installation.
- Use insulated tools to prevent electric shock.
- Wear appropriate protective gear, such as gloves and safety glasses.
- Keep children and pets away from the installation area.
- Familiarize yourself with the manufacturer's instructions and guidelines.
Troubleshooting Common Issues
If you encounter any issues with your electric fence gate handle, here are some common problems and their solutions:
Electric Fence Handle Not Working
If the gate handle fails to provide an insulated grip or doesn't open the gate properly, check the wire connections and the handle itself. Ensure the gate attachment bracket is securely mounted, and the wire connections are tight and free from corrosion. If necessary, replace the gate handle with a new one.
Fence Wire Not Conducting Electricity
If the fence wire doesn't conduct electricity, check for breaks or loose connections along the fence line. Test the energizer or power source to ensure it's functioning correctly. If you identify any faults, repair or replace the defective components as needed.
Gate Handle Not Secure
If the gate handle feels loose or unstable, check the gate attachment bracket and mounting screws. Tighten any loose screws and ensure the bracket is properly aligned and securely attached to the gatepost.
Maintenance and Care
To ensure the longevity and functionality of your electric fence gate handle, regular maintenance is essential. Follow these tips:
- Inspect the gate handle and wire connections periodically for any signs of wear, damage, or corrosion.
- Clean the gate handle and bracket using a mild detergent and water solution.
- Remove any vegetation or debris that may obstruct the gate's movement or affect the wire connections.
- Test the gate handle regularly to ensure it provides a safe and insulated grip.
Conclusion
Installing an electric fence gate handle is a straightforward process that allows for easy access to your fenced area while maintaining the effectiveness of the electric fence. By following the step-by-step guide outlined in this article, you can ensure a secure and functional gate handle installation. Remember to prioritize safety and conduct regular maintenance to keep your electric fence gate handle in optimal condition.


_KPIGREENENERGY.jpg)
6.jpg)
2.jpg)